Randgrid.sys is a driver file associated with Call of Duty; it’s an essential part of this game. This driver file helps is mandatory for the game’s operation. So, basically you need to keep this particular file intact to run the game smoothly. The malfunctioning of this file may lead to system freezes, slowdowns and frequent crashes and eventually BSOD Error.
Several users have claimed the above mentioned error while launching the Call of Duty game via Steam or Battle.net platforms. Blue Screen of Death (BSOD) is a critical situation which connotes major flaws in your Windows Operating System. Such kinds of errors appear with stop code that assists the users in diagnosing the issue which is throwing the error. When this error surfaces, it stops all the operation, you need to understand that your system is alerting you take an immediate action to prevent severe crisis.
And if we talk about the causes that manifest the error, the factors may include interference from VPN services, obsolete/corrupted drivers or if the driver lacks a proper digital signature. Apart from this, buggy Windows updates, presence of malware, corrupted/damaged system files and incompatibility issues with the third party apps.
But thankfully, these errors can be tackled with tried and tested methods. We have enlisted some of the effective measures to get rid of the error; you can try them one by one until you get the most suitable fix for yourself.
Try these Methods to fix Randgrid.sys BSOD Error
Method 1: Uninstall the most Recent Windows Update
If you are facing the error just after a Windows update in such case, we suggest you to uninstall the most recent Windows Update. To do so follow the below mention guidelines:
Step 1: In Windows Search bar, type in Control Panel in Windows Search and press Enter
Step 2: Select Programs> Uninstall a Program
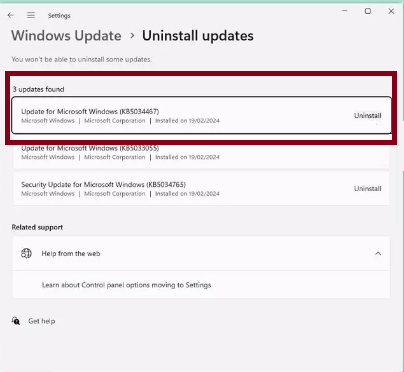
Step 3: Click on View installed updates on theleft side of the window
Step 4: Uninstall the most recent update > Proceed with on-screen instructions
Step 5: Now Pause the Update
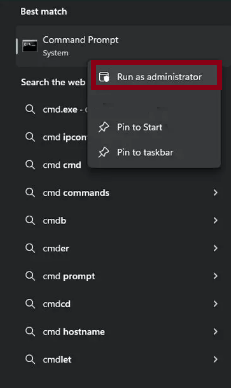
Method 2: Run SFC and DISM Scan
In this method we suggest you to run SFC and DISM Scans. These two utility tools will repair your corrupted system files. To proceed use the following steps:
Step 1: In Windows Search bar, type in cmd > Right-click on Command Prompt and select Run as administrator
Step 2: User Account Control should pop-up- click Yes > Now type this command and press Enter key:
sfc /scannow
Step 3: Now wait for the scan to finish> As soon as the scan finishes, Windows will report whether integrity violations were found and if they could be fixed. After that, use the following commands next, press Enter key after each:
Dism /Online /Cleanup-Image /CheckHealth
Dism /Online /Cleanup-Image /ScanHealth
Dism /Online /Cleanup-Image /RestoreHealth
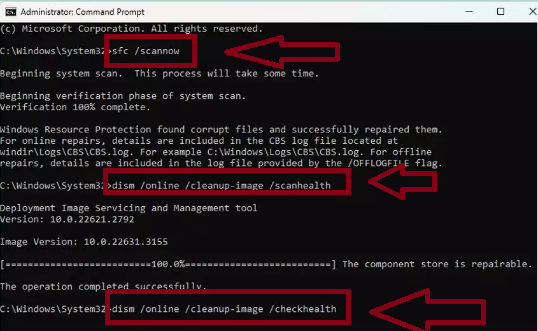
Step 4: Finally close the Command Prompt and Restart your device
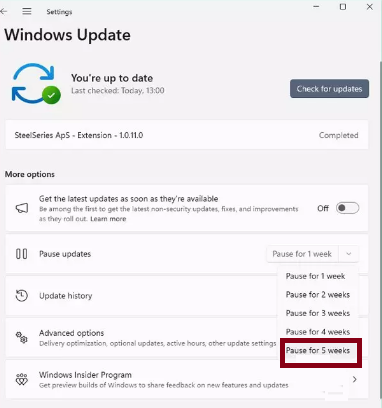
Method 3: Install all Windows Updates
If you have not updated your Windows from long time, its quit possible the bugs in your system is preventing the game from launching. So we suggest you to install all Windows Update to ensure all components are compatible and functioning.
Here’s how:
Step 1: In the Window search bar, type in Updates and press Enter key> Now the new window will open and you should be notified about available updates- click Install all
Step 2: If none are available, click Check for Updates and they should be installed automatically> also install all the optional updates
Step 3: Finally Restart your PC
Method 4: Verify Game files on Steam or Battle.net
In this method we suggest you to verify game files. You are most likely to face the Randgrid.sys cannot delete error if your game files are not intact. So kindly check the integrity of your game files.
Here’s how:
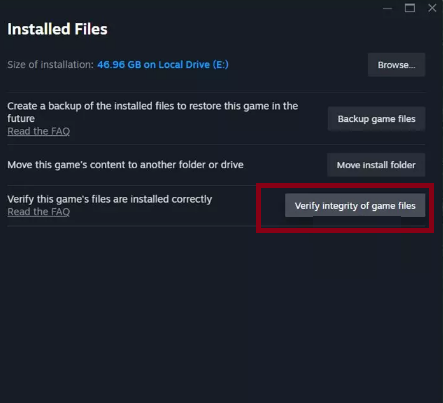
For Steam:
Step 1: First of all open Steam >navigate to your Library
Step 2: Then right-click on the game and then Properties > on the left side, choose Installed files
Step 3: Click Verify integrity of the game files >Now wait till the process is finished and launch the game
For Battle.net
Step 1: Open the Battle.net app > select Call of Duty from your game list
Step 2: Now click the cogwheel (Options) next to the Play button
Step 3: Select Scan and repair > Click Begin Scan and wait till it’s finished> finally launch the game
Method 5: Delete Randgrid.sys file
If you are still struggling with Randgrid.sys BSOD, it is recommended to delete the Randgrid.sys file. To proceed follow t below mention steps:
Here’s how:
Step 1: Go to one of the following locations (depending on the platform)
C:\SteamLibrary\steamapps\common\Call of Duty HQ
C:\ProgramData\Battle.net_components\randgridauks
Step 2: Now locate the Randgrid.sys file > Right-click on the file and select Delete
Step 3: Empty the recycle bin to permanently remove the file> Finally Restart your PC and verify game files on Steam to restore the deleted file.
Method 6: Move the game to the SSD file
Several users have claimed that moving the game to an SSD drive can improve load time and system stability. To proceed use the following steps:
Step 1: First of all open Steam and navigate to the library
Step 2: Right-click on Call Duty and select Properties >Under the Installed files tab, click on the Move Install folder
Step 3: Now select a destination folder located on your SSD > click Move folder and wait for the process to complete
Step 4: Finally Restart your PC

Method 7: Scan for Malware
You are most likely to face the above mention error if your system is infected with malicious programs, in such case, it is recommended to scan for malware.
Here’s how:
Step 1: Tap on the “Start” button and type in “security” > press the “Enter” key to launch the Security app
Step 2: Now select “Virus & threat protection”> then click on “Scan Options”> finally “Full Scan” and select “Scan now”
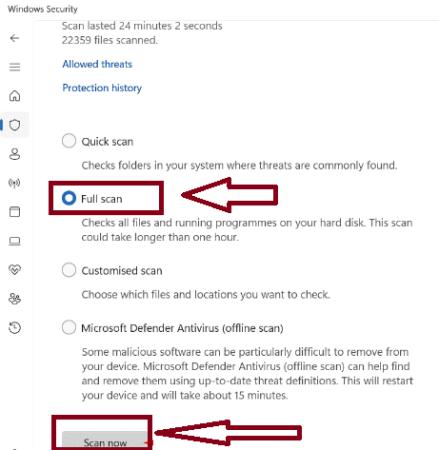
Step 3: This will take a lot of time so you need to wait and then follow the on-screen instructions to complete the process
Method 8: Delete third-party programs
Sometimes third-party apps interfere a lot, so you can uninstall the apps temporarily. Here’s how:
Step 1: Right-click on “Start” and select “Installed apps”
Step 2: Scroll down in the Settings window and find the third party app in the list> tap on the three dots and select Uninstall
Step 3: If a prompt appears, follow the on-screen instruction until the app is removed> finally Restart your PC
Method 9: Reinstall the Game
If none of the above mentioned methods works for you we suggest you to reinstall the game. To do so follow the below mention guidelines:
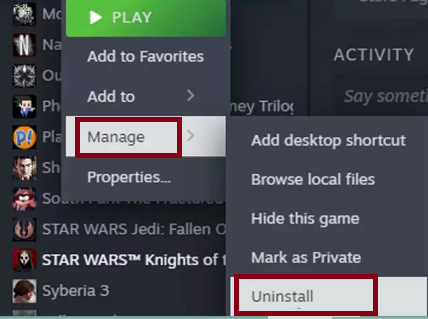
Step 1: Firstly open Steam > Navigate to the Library, right-click on Call of Duty, and select Uninstall
Step 2: Confirm the Uninstallation > once the game is uninstalled, Restart your PC
Step 3: Now Return to Steam and reinstall Call of Duty
Step 4: After installation, verify game files to ensure all files are correctly installed> if you are using Battle.net, use similar steps.
Go for an Automatic Solution
We have mentioned all the possible methods to get past the above mention error but there no doubt that these methods are time consuming. So considering the time constraints we suggest you to use an automatic PC Repair tool. This professional is capable for resolving the errors originated due to system corruption. So try the tool and fix the error without any hassle.
⇑Get PC Repair Tool from Here⇓
Bottom Line!
That’s all guys! We really hope you managed to fix the Randgrid.sys BSOD and you learnt something from this blog. Thanks for Reading.


