What is ‘Wifi icon greyed out’ issue in Windows 10/11?
In this post, we are going to discuss on How to fix Wifi icon greyed out Windows 10/11. You will be guided with easy steps/methods to resolve the issue. Let’s starts the discussion.
‘Wifi icon greyed out’ issue: It is common Windows Problem considered as Wifi icon greyed out problem. It is quite simple & easy to access and use WiFi network in your Windows 10/11 computer by clicking WIFi icon available in System Tray in taskbar. When you click on WiFi icon (When it is turned OFF), WiFi is enabled in your device with available WiFi network shows on the screen. You can quickly access to WiFi network/internet by logging into WiFi network by entering its credentials if applicable.
However, several users reported they faced Wifi icon greyed out Windows 10/11 issue when they tried to turn ON the WiFi on their Windows 10/11 computer. They explained when they run troubleshooter in to detect and fix the issue, troubleshooter shows error message ‘Wireless capability is turned OFF’ that means the physical switch present on the keyboard is turned OFF, and you need to manually turned it ON in order to resolve the issue.
There could be several reasons behind the issue including WiFi is disabled in BIOS, incorrect network settings, corrupted/outdated network drivers, outdated BIOS, disabled WLAN AutoConfig service, and other Windows issues. It is possible to fix the issue with our instructions. Let’s go for the solution.
How to fix Wifi icon greyed out Windows 10/11?
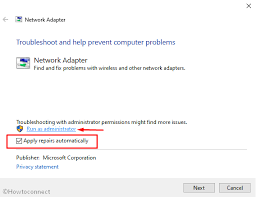
Method 1: Fix ‘Wifi icon greyed out’ issue with ‘PC Repair Tool’
‘PC Repair Tool’ is easy & quick way to find and fix BSOD errors, DLL errors, EXE errors, problems with programs/applications, malware or viruses infections in computer, system files or registry issues, and other system issues with just few clicks.
Method 2: Turn ON physical switch for WiFi on keyboard
This issue can be occurred if you have accidently press the physical button to switch OFF WiFI or some program may have disabled it. You can fix the issue by pressing the physical button again to turn ON WiFi like Fn+F2 keys on keyboard or others, and check if it works for you.
Method 3: Enable WiFI Connection
Step 1: Right-click on ‘Network’ icon in notification area and select ‘Network and Sharing Center’
Step 2: Go to ‘Change Adapter Settings’, right-click on your WiFi network and select ‘Enable’ to enable it, and then check if it works for you.
Method 4: Run Network troubleshooter
Step 1: Right-click on ‘Network’ icon in notification area and select ‘Troubleshoot Problems’ and follow on-screen instructions to finish troubleshooting.
Step 2: Now, open ‘Troubleshooting’ via Windows Search Box and select ‘Network and Internet > Network Adapter’, and follow on-screen instructions to finish troubleshooting and once done, check if the issue is resolved.
Method 5: Turn ON Wireless Capability
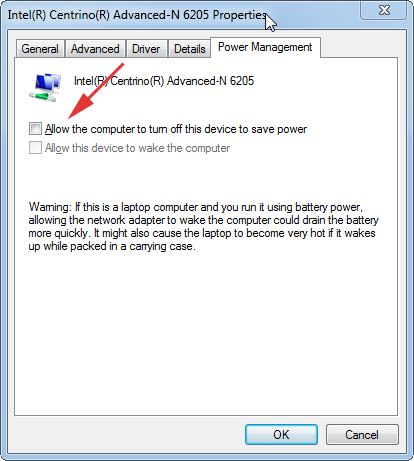
Step 1: Open ‘Network and Sharing Center’ via Windows Search Box and go to ‘Change Adapter Settings’
Step 2: Right-click on your WIFi network and select ‘Properties’. Click ‘Configure’ next to your network adapter and click ‘Power Management’ tab
Step 3: Uncheck ‘Allow the computer to turn OFF this device to save power’ checkbox and hit ‘Ok’ button to save the changes. Once done, restart your computer and check if the issue is resolved.
Method 6: Enable WiFi from BIOS
Step 1: Restart your computer and when booting initiates, press ‘F2’, ‘DELETE’ or other BIOS supported key to enter into BIOS mode
Step 2: Go to ‘Configuration’ tab or similar, and turn ON ‘Wireless LAN Support’ option. Save the changes and exit BIOS and then restart your computer, and check if it works for you.
Method 7: Turn WiFi ON from ‘Windows Mobility Center’
Step 1: Open ‘Windows Mobility Center’ via Windows Search Box
Step 2: Inside ‘Windows Mobility’ Center’, turn ON your WIFi Connection, and restart your computer to see the changes and check if it works.
Method 8: Enable WLAN AutoConfig Service
Step 1: Open ‘Services’ app in Windows PC via Windows Search Box
Step 2: Find and double-click ‘WLAN AutoConfig’ service to open its Properties. Select ‘Automatic’ from ‘Startup Type’ dropdown, and hit ‘Start’ button under ‘Service Status’ section, and then hit ‘Apply > Ok’ button to save the changes. Once done, restart your computer and check if the issue is resolved.
Method 9: Fix Wifi icon greyed out Windows 10/11 using Registry Editor
Step 1: Open ‘Registry Editor’ app in Windows PC via Windows Search Box and navigate to following path
Computer\HKEY_CURRENT_USER\Software\Classes\Local Settings\Software\Microsoft\Windows\CurrentVersion\TrayNotify
Step 2: Make sure you have select ‘TrayNotify’ in left pane, right-click on Iconstreams and PastIconStreams registry key one-by-one and select ‘Delete’ to delete them. Once done, restart your computer and check if the issue is resolved.
Method 10: Update Wireless Network Adapter Driver

Step 1: Open ‘Device Manager’ in Windows PC via Windows Search Box and expand ‘Network Adapters’ category
Step 2: Right-click on your network adapter and select ‘Update Driver’ and follow on-screen instructions to finish update. Once updated, restart your computer and check if the issue is resolved.
Download or reinstall Network driver update in Windows PC [Automatically]
You can also try to update all Windows drivers to latest & compatible version using Automatic Driver Update Tool. You can get this tool through button/link below.
Method 11: Update BIOS
Updating BIOS to latest & compatible version can resolve the issue. You should follow your PC/laptop’s manufacturer official guidelines to download & install BIOS update in your computer and once updated, check if the issue is resolved.
Conclusion
I am sure this post helped you on How to fix Wifi icon greyed out Windows 10/11 with several easy steps/methods. You can read & follow our instructions to do so. That’s all. For any suggestions or queries, please write on comment box below.


