
Tips to fix Driver Verifier DMA Violation – BSOD error in Windows 10:
In this article, we are going to discuss on How to fix Driver Verifier DMA Violation Windows 10. You will be guided with easy steps/methods to resolve the issue. Let’s starts the discussion.
‘Driver Verifier DMA Violation’ error – BSOD: It is common Windows Problem considered as Blue Screen of Death (BSOD) error. This error is appeared with message saying ‘Your PC ran into a problem and needs to restart. We’re just collecting some error info, and then we’ll restart for you’ along with some Windows Stop Codes like Driver Verifier DMA Violation error. This BSOD error is usually appeared in the middle of your work on computer, on when you start/restart your computer.
If you are not aware, Driver Verifier is a tool that is included in all Microsoft Windows 10 systems and can be run on demand. It is used to track drivers and their potential violations due to operation of OS. However, this utility may crashes and instable in your computer and if yes, it may cause BSOD error or others in computer. There could be several reasons behind the issue including the corruption in system files or registry, or in system image, outdated BIOS, outdated Windows OS, and other issues. Let’s go for the solution.
How to fix Driver Verifier DMA Violation Windows 10?
Method 1: Fix Driver Verifier DMA Violation error with ‘PC Repair Tool’
‘PC Repair Tool’ is easy & quick way to find and fix BSOD errors, DLL errors, EXE errors, problems with programs/applications, malware or viruses infections in computer, system files or registry issues, and other system issues with just few clicks.
Method 2: Update Windows OS
Updating Windows OS to latest version can resolve the issue.
Step 1: Open ‘Settings’ App in Windows PC via Windows Search Box and go to ‘Update & Security > Windows Update’ and click ‘Check for Updates’ button
Step 2: Download and install all available updates in computer and once updated, restart your computer and check if the issue is resolved.
Method 3: Disable Driver Verifier
You can disable Driver Verifier in computer in order to fix.
Step 1: Type ‘Verifier’ in Windows Search Box and open it from results appear
Step 2: Choose ‘Delete Existing settings’ option and click ‘Finish’
Step 3: Once done, restart your computer and check if the issue is resolved.
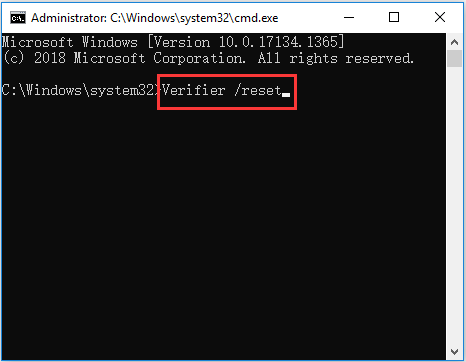
Step 4: If not, type ‘cmd’ in Windows Search Box and press ‘SHIFT + ENTER’ keys on keyboard to open ‘Command Prompt as Administrator’
Step 5: Type ‘verifier /reset’ command and hit ‘Enter’ key to execute. Once executed, restart your computer and check if the issue is resolved.
Method 4: Update device drivers
Updating all necessary device drivers to latest & compatible version can resolve the issue.
Step 1: Open ‘Device Manager’ in Windows PC via Windows Search Box and look for the device driver that is showing Yellow Mark
Step 2: Right-click on device driver you want to update, and select ‘Update Driver’ and follow on-screen instructions to finish update process. Repeat the same steps to update all other necessary drivers. Once updated, restart your computer and check if the issue is resolved.
Download or reinstall device drivers update in Windows PC [Automatically]
You can also try to update all Windows drivers to latest & compatible version using Automatic Driver Update Tool. You can get this tool through button/link below.
Method 5: Run Blue Screen troubleshooter
Windows built-in Blue Screen troubleshooter can resolve the issue.
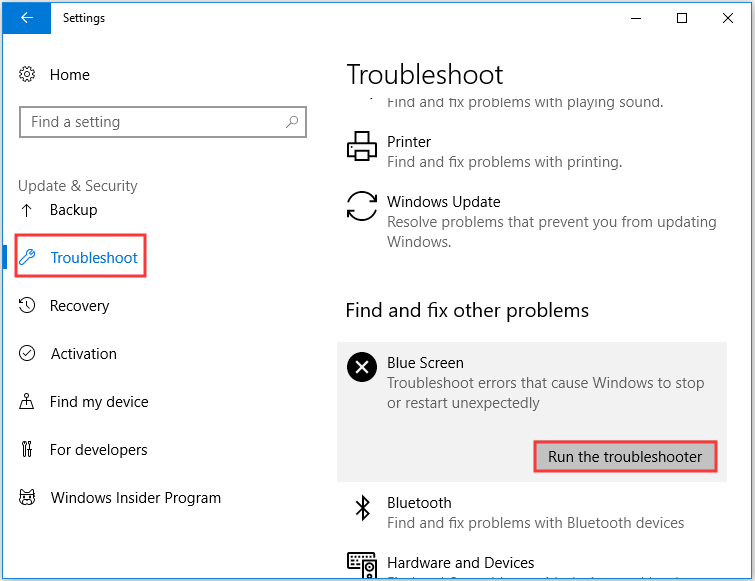
Step 1: Open ‘Settings’ App in Windows PC via Windows Search Box and go to ‘Update & Security > Troubleshoot’
Step 2: Find and select ‘Blue Screen’ troubleshooter, and click ‘Run the troubleshooter’ and follow on-screen instructions to finish troubleshooting and once finished, check if the issue is resolved.
Method 6: Run SFC scan and DISM scan
You can run SFC scan and DISM scan in computer to repair the corruption in system files and system image in order to fix this error.
Step 1: Type ‘cmd’ in Windows Search Box and press ‘SHIFT + ENTER’ keys on keyboard to open ‘Command Prompt as Administrator’
Step 2: Type the following commands one-by-one and hit ‘Enter’ key after each to execute.
sfc /scannow
DISM.exe /Online /Cleanup-image /Restorehealth
Step 3: Once executed, restart your computer and check if the issue is resolved.
Method 7: Check for problematic hardware
This issue can be occurred due to some issue with hardware device connected into your computer. You can disconnect all peripherals from your computer and check if the issue is resolved. Also, you can replace the problematic hardware with new one or a different one in order to fix, and check if the issue is resolved.
Method 8: Update BIOS
Updating BIOS to latest version can resolve the issue. You should follow your PC/Laptop’s manufacturer official guidelines to perform this and once updated, check if the issue is resolved.
Method 9: Update SSD Firmware
You can also try to fix the issue by updating SSD firmware software in computer. You should follow manufacturer’s official guidelines to perform this and once done, check if it works for you.
Method 10: Perform System Restore
If the issue is still persist, you can perform System Restore operation in computer in order to fix.
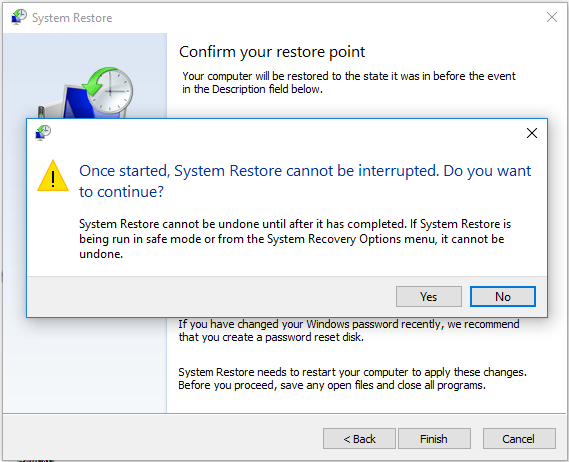
Step 1: Press ‘Windows + R’ keys on keyboard, type ‘rstrui’ in ‘Run’ window and hit ‘Ok’ button to open ‘System Restore’ app
Step 2: Click ‘Next’, select a valid restore point according to date & time when there was no issue at all in computer, and then click ‘Next > Finish’ to start restoring process and once finished, restart your computer and check if the issue is resolved.
Conclusion
I am sure this post helped you on How to fix Driver Verifier DMA Violation Windows 10 with easy steps/methods. You can read & follow our instructions to do so. That’s all. For any suggestions or queries, please write on comment box below.


